After my adventures in getting the IP address of the router to change, I discovered that the unit won’t keep DHCP disabled. You can turn it off (since I wanted to do DHCP from the Pi-hole), but if you reboot the router it gets turned back on. Since two DHCP servers on the same network never works out well, I opted to turn a Raspberry Pi 4 into a router, and set the F3000 into bridge mode.
OpenWRT
Since setting bridge mode would result in no Internet, the first step was to get the Pi to act as a router. After some reading, I settled on running OpenWRT on the Pi. At the time I started this project, OpenWRT support for the Pi 4 was “unofficial”, and after a lot of forum reading, I discovered wulfy23’s snapshot build. This looked like what I’d want, so downloaded, wrote to a SD card, and booted the Pi. It’s got a few bits that I don’t need or want, so I uninstall those, but otherwise it’s been fine for the past few months.
I’m not keen on the Argon theme that wulfy23 ships by default; I find Material more pleasant (plus you get Bootstrap and OpenWRT as options too). As an example, here’s how one of the dropdowns renders – not a fan of that white shadow on “Please choose”.

I made a mistake when applying an upgrade the other day, and used the default OpenWRT snapshot sysupgrade image (since the support for the Pi4 is now more official than when I started this project). The net result was my entire config was gone, all the packages were gone, and I had no network. Yay phone tethering! I could have restored the ISP router to non-bridge mode I suppose.
The Material UI, as I’ve noted, is what I prefer. It looks like this on the status page.
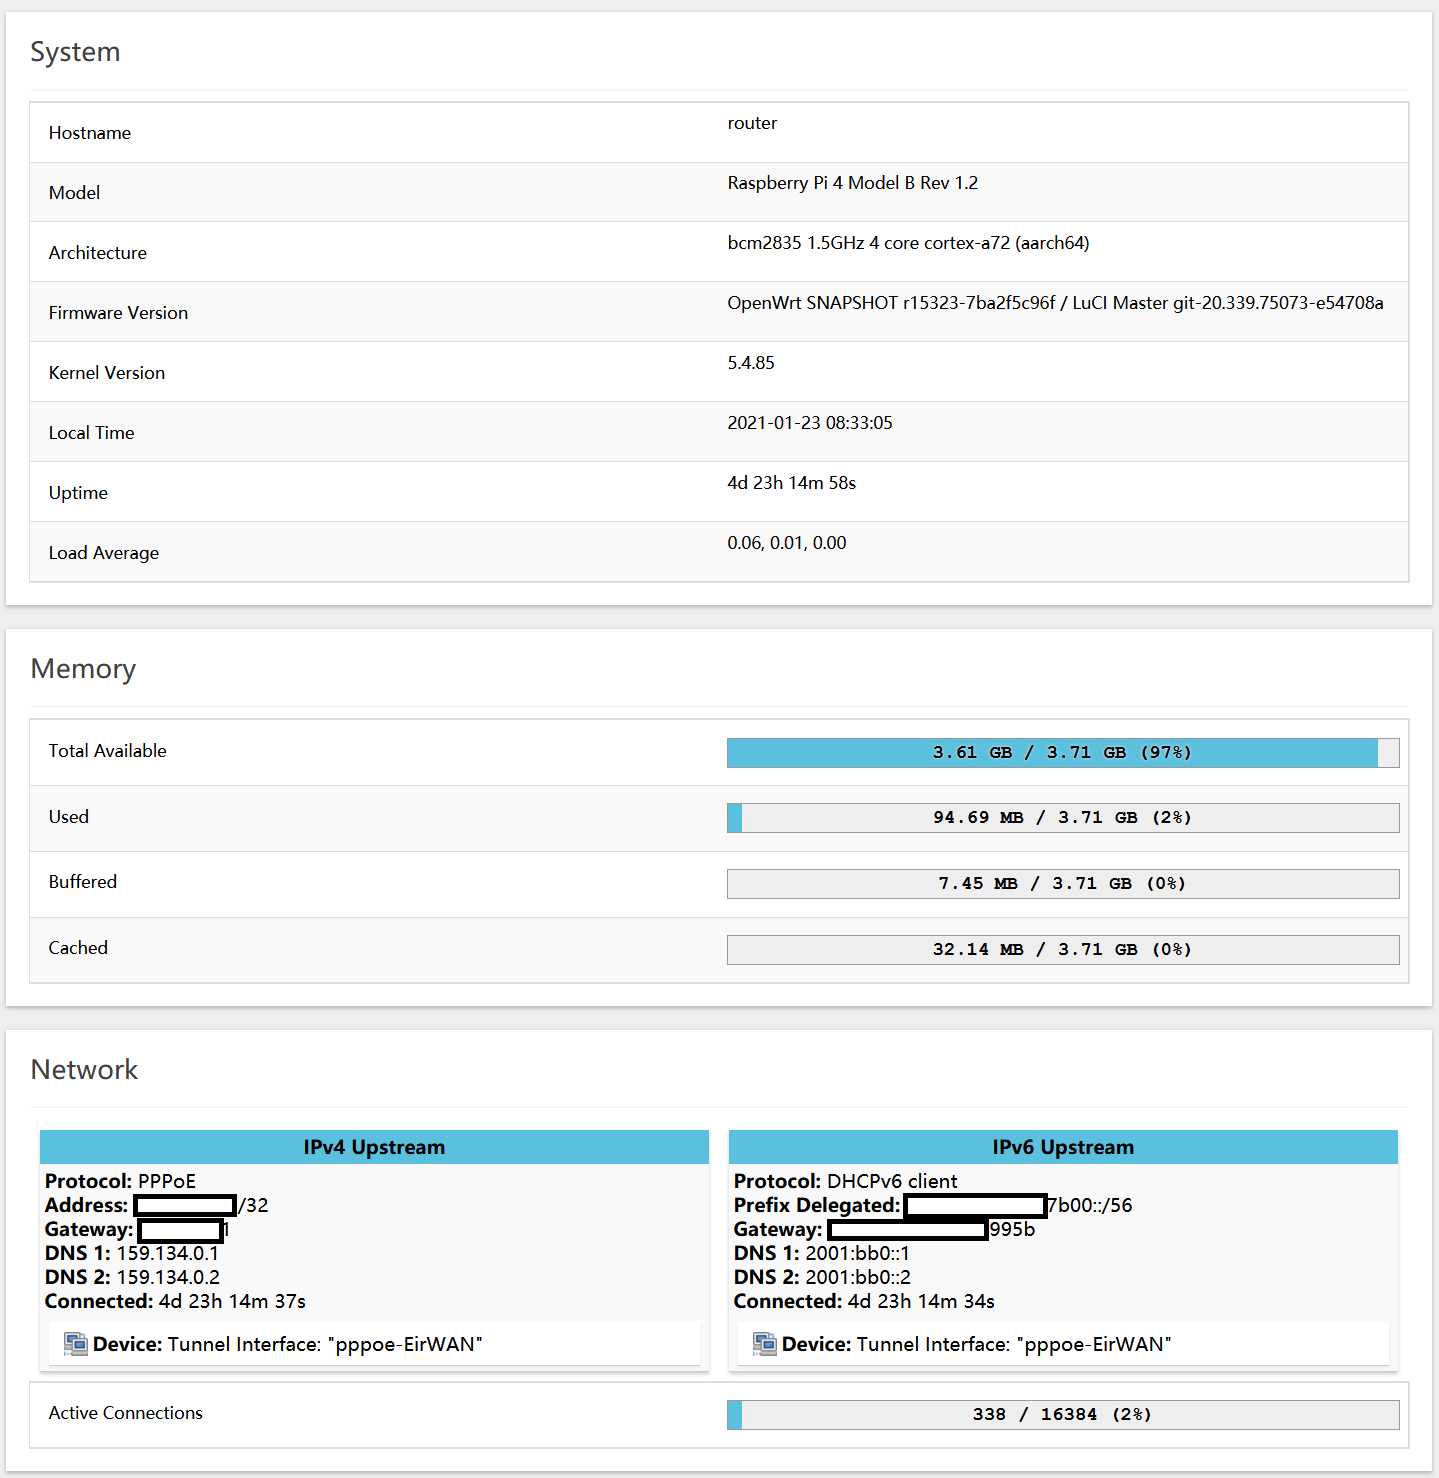
I discovered, while writing this blog post, that the OpenWRT install is running a RRD collector for the system temperature, and I can clearly see the heating coming on around 6 in the morning, and the cooling cycle overnight when the heating is off. The room ambient is swinging from ~15 C to ~19 C, so the swing on the Pi 4 maps pretty well to the ambient change.

OpenWRT configuration
The configuration is pretty simple – use the onboard Ethernet port as the LAN, a USB dongle Ethernet port as the WAN (Anker AK-A7611011, supported by the r8152 driver). My ISP can only provide me with 90 Mbit/s downlink, so the onboard port of a Pi 4 doesn’t restrict me in any way – there’s a Ubiquiti switch between the LAN and the Pi 4, and the USB dongle is wired directly to the F3000.
The WAN connection is configured as a PPPoE link, using the credentials eir@eir.ie / broadband1 to bring the link up. IPv6 is enabled as “builtin management”, and it just works – the bridge-mode router gets a DSL sync, and the PPPoE link comes up and provides both IPv4 and IPv6 addressing to the router, and it in turn provides addresses to all of the LAN machines.
Pi-hole
With the Pi 4 running OpenWRT configured to do DHCP, I turned DHCP off on the Pi-hole. Yes, I started this adventure because the ISP router interfered with the Pi-hole DHCP, but I found the combo of OpenWRT and Pi-hole was easier with the router doing the DHCP this time around. The Pi-hole knows to forward DNS queries about hostnames in “.local” to the router, and the router knows to set the Pi-hole as the official DNS server for the network. With the ISP router, getting it to keep alternate DNS settings as well was a pain, so I’m ok with the Pi-hole not being the DHCP service any more. Makes IPv6 easier too – the router just handles all of it.
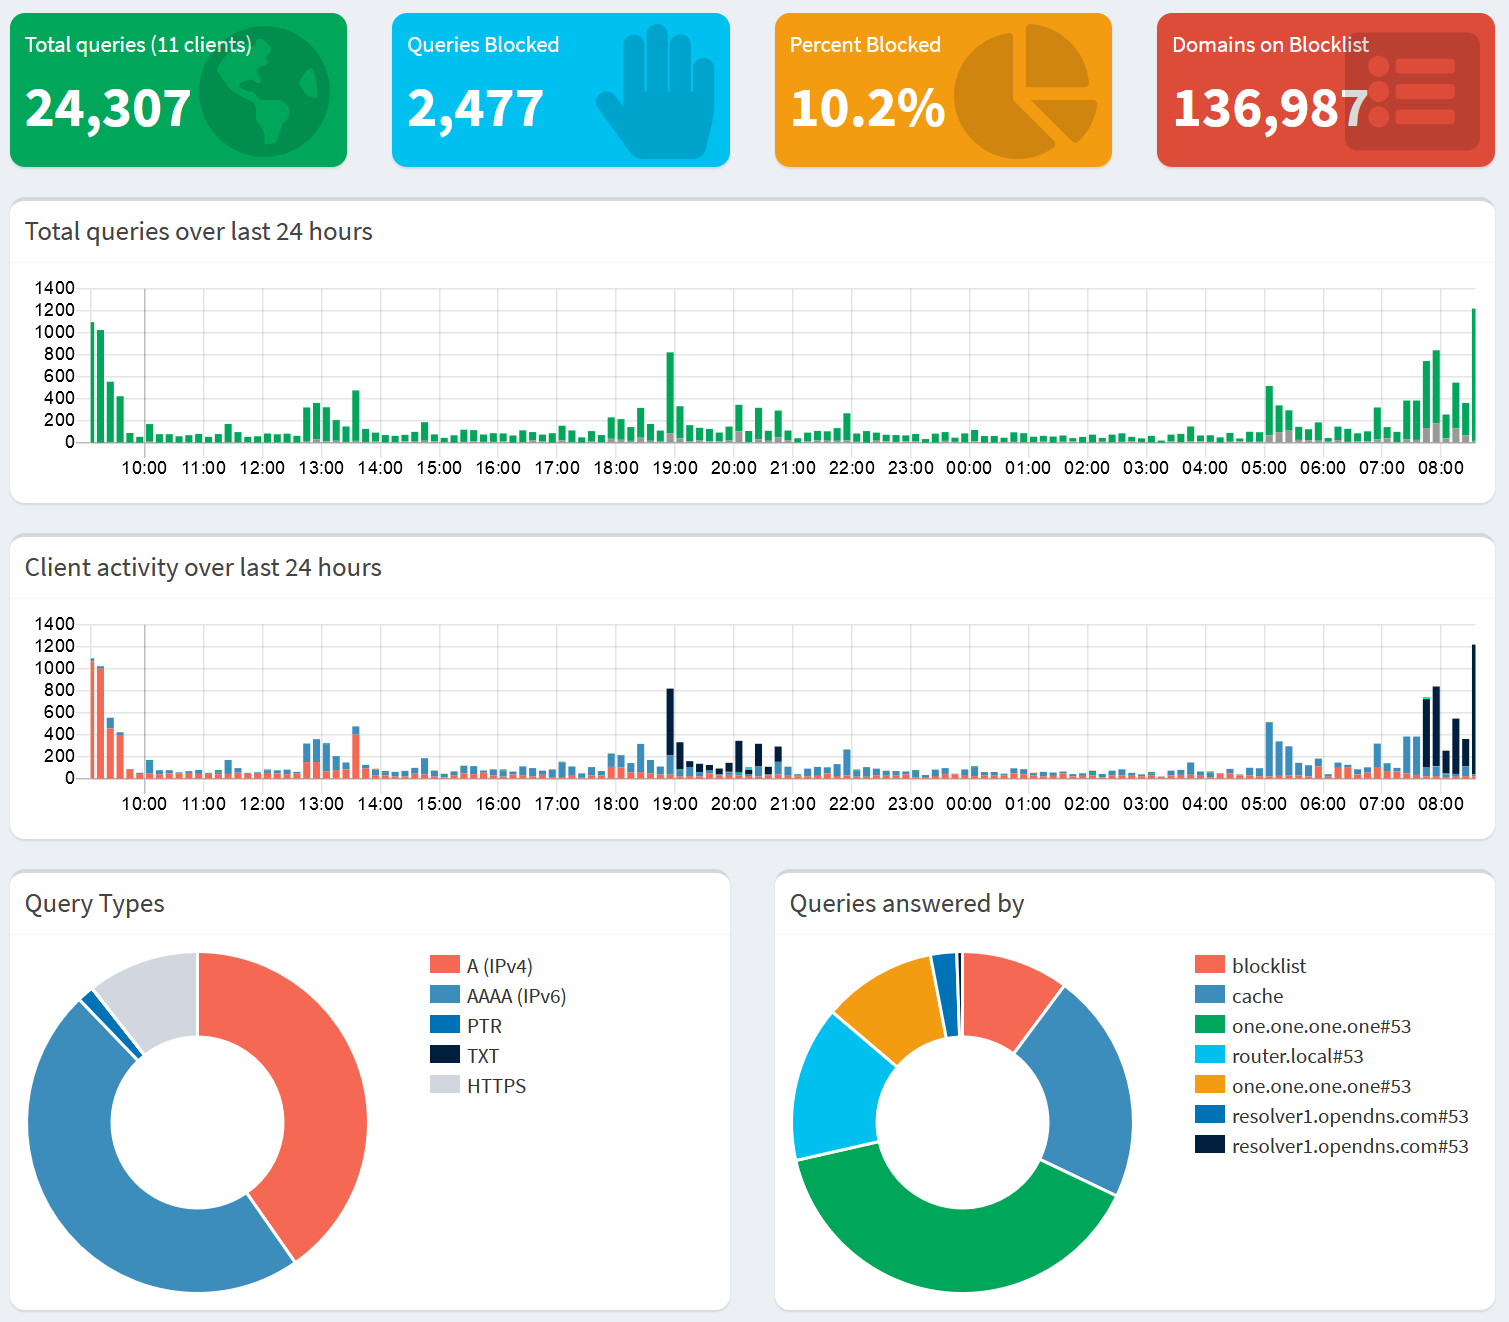
That 10% block rate is nice to see, and my Internet browsing is way faster without all the traffic to the ad networks. Plus, it’s well documented that a number of malware attacks have happened because the malicious actor got an ad network to run Javascript for them (I miss the days of the standardised banner ads that could only be images, no animation, no code execution) – so faster and safer Internet browsing is a good thing.
Bridge mode
To set bridge mode, I followed the instructions at https://cottse.wordpress.com/2020/02/05/eir-f3000-configure-for-bridge-mode/ (archive). Pretty trivial.
IPv4 being picked first
This probably had nothing to do with this change, but I found while using ipv6-test.com that my browser was defaulting to IPv4 connectivity, even when IPv6 addresses were available. Chrome and Firefox both have a fallback mechanism, where the priority is IPv6, and if things don’t work in 300 ms a fallback to IPv4 is done. However, in a network where IPv6 and IPv6 name resolution is working, both browsers should have picked IPv6 first.
I finally found a blog post (archive) that talked about deliberately doing what my browsers were doing, and it had a screenshot of the default IPv6 policies on Windows. I compared those settings to my settings, and discovered that for some reason my machine had “IPv4-mapped IPv6 address” (source, archive) at priority 50, while the screenshot in the blog post showed it at priority 10.
A quick netsh command fixed that, and now my browsers are defaulting to IPv6 connectivity.
netsh interface ipv6 set prefixpolicy ::ffff:0:0/96 10 4For the record, this is my previous netsh prefixpolicy
Precedence  Label  Prefix
----------  -----  --------------------------------
        50      0  ::ffff:0:0/96
        40      1  ::1/128
        30      2  ::/0
        20      3  2002::/16
         5      5  2001::/32
         3     13  fc00::/7
         1     11  fec0::/10
         1     12  3ffe::/16
         1      4  ::/96
And this is it now
Precedence  Label  Prefix
----------  -----  --------------------------------
        40      1  ::1/128
        30      2  ::/0
        20      3  2002::/16
        10      4  ::ffff:0:0/96
         5      5  2001::/32
         3     13  fc00::/7
         1     11  fec0::/10
         1     12  3ffe::/16
         1      4  ::/96